Night Photography

Product Review: Laowa 10mm f/2.8 lens for Z-mount 1024 576 Jeff G
laowa-10mm-crop

Product Review: Laowa 10mm f/2.8 lens for Z-mount

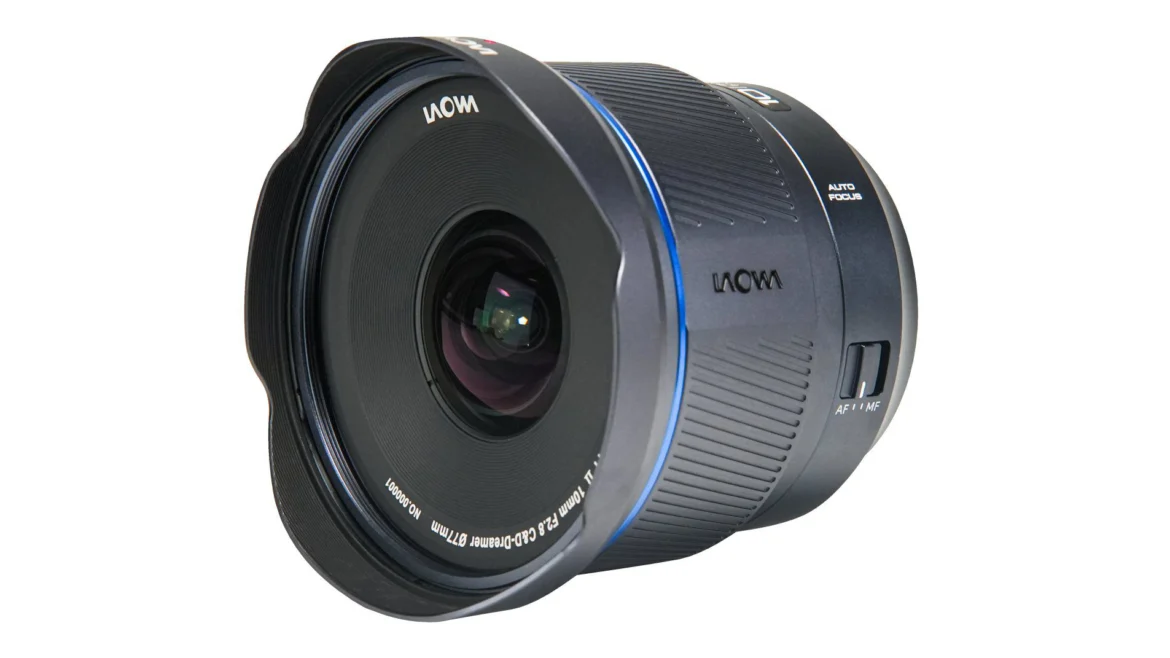
Laowa 10mm f/2.8 Zero-D FF (14 Blades Manual Focus) for Nikon Z Mount


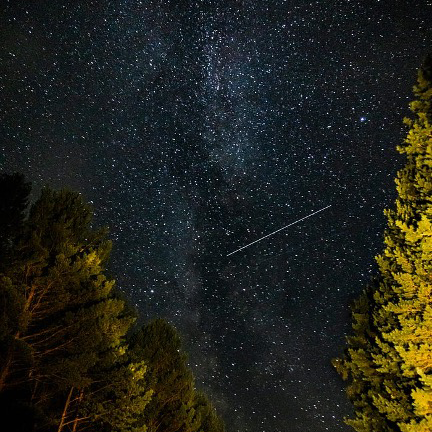
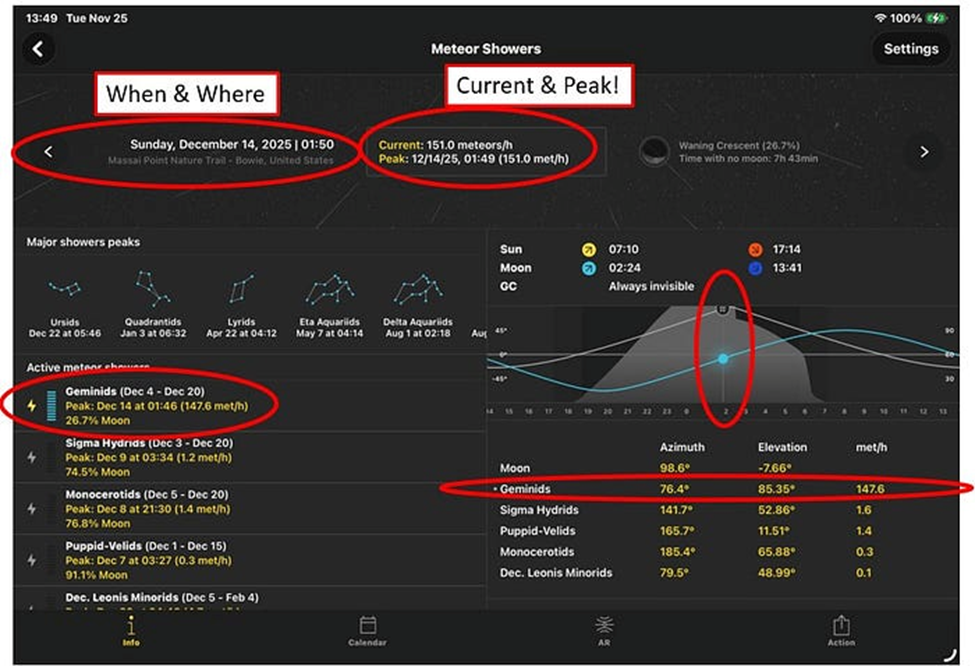
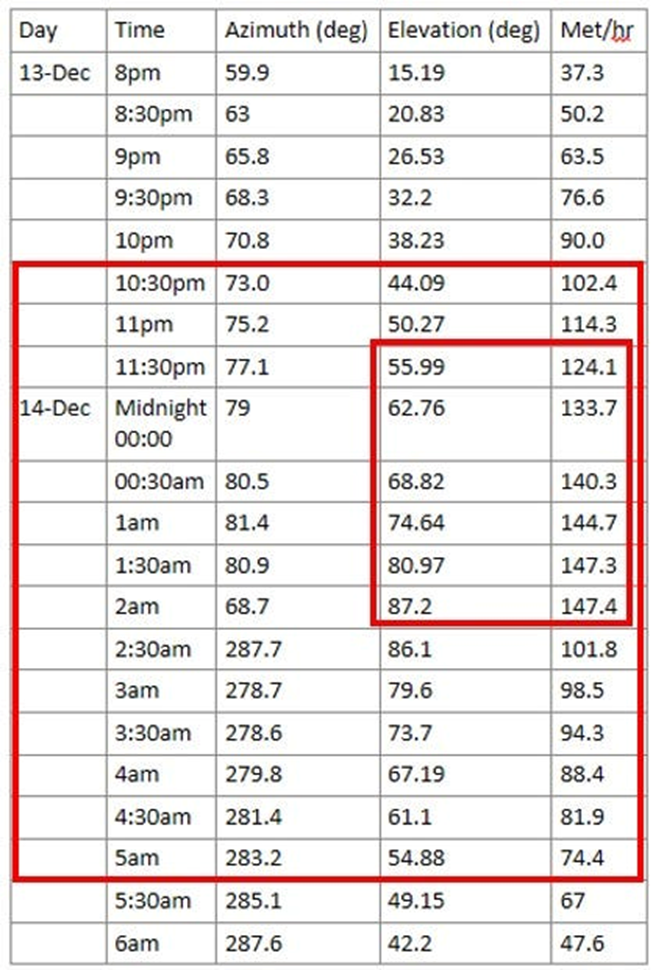
In November-2025, I was preparing and planning for my mid-December Geminids meteor shower photo trip to Arizona. This was to be my first time to shoot a meteor shower.

As part of that, I was looking for a widest wide angled lens (wider than my 14-24mm f/2.8m) that was NOT a fish eye lens, so I started asking around. Ultimately, a photo buddy, Matt Hill, recommended I look at the Laowa 10mm lens.

Affiliate Disclosure: Some links on this page are affiliate links. If you purchase through them, I may earn a commission at no additional cost to you. I only recommend products that I personally use or believe provide value.


After reading some reviews and wanting a wider lens, I bought the lens. Thankfully, it arrived a few days before my trip.

I had two camera set-ups running for the Geminids. One with my 14-24mm lens on my Nikon Z8. And a second camera set-up with a rented Nikon Z8 (via Photo Rental Source in Houston) and my new Laowa 10mm lens.

Click here to out my other blog post about my prep for that trip, if you want to read more about the whole trip prep.

I processed my photos to make a star trails blend, but I’m still working on pulling the meteors together to get that photo. Time is the one thing we can all use more of!


Back to the 10mm lens…

The Laowa 10mm f/2.8 Zero-D FF is one of the widest full-frame rectilinear lenses available for the Nikon Z cameras —and that alone makes it intriguing. At 10mm, you’re firmly in ultra-wide territory, yet Laowa’s “Zero-D” (zero distortion) design aims to keep straight lines straight, making it especially attractive for architecture, interiors, and dramatic landscape work. Built with a solid all-metal barrel and a manual focus design, this lens feels purpose-built for deliberate photographers who value precision over automation.


Key Specs

  • Focal length: 10mm
  • Viewing angle: 130.4 degrees
  • (Manual) Aperture range: f/2.8 – 22 (15 blades)
  • Shooting distance: 4.72in (12cm) to infinity
  • Weight: 0.93lbs (420g)
  • Mount: Z-mount for Nikon
  • Full frame (FF)
  • Zero distortion
  • Manual focus, internal focusing
  • Filter size: 77mm
  • Water & dust resistant
  • USB-C port for firmware upgrades
  • (Feb-2026) Price range: ~ $799 USD (plus tax), per Amazon

Laowa makes two different versions of this lens:

  1. Autofocus version with a 5-blade aperture (ca. $664 USD)
  2. Manual version with a 14-blade aperture (ca. $799 USD)

On the basis of having a smoother aperture window using 14-blades, I went for the manual focus lens.


The Review

  • I wanted a full frame ultra-wide-angle without distortion (no fish eye) and this lens delivered.
  • With a hyper focal distance being so close to the lens, it was easy to manually focus the lens, especially when using the Nikon Z8 focus peaking function.
  • Since the lens is manual (both focus and aperture setting), there are no contacts on the lens to share data with the camera.
  • Why Laowa bothers with both an autofocus 5-blade and manual-focus 14-blade version of this lens is not clear to me. I’d say take the best of both worlds and make the autofocus 14-blade, but I presume they know their market and pricing strategy better than I do.
  • Photo quality was good. Content was sharp and I didn’t notice any softness in the corners.
  • This lens will definitely be one to put in the camera bag for my night photography: star trails and Milky Way shots.
  • This lens is slightly larger than my hand when made into a fist. It’s a great little lens that just works.
  • Good value and price for what it offers.

Overall

⭐️⭐️⭐️⭐️1/2 (4.5 of 5)


Overall, if you’re looking to add a dramatic, distortion-controlled ultra-wide tool to your Nikon Z kit (and you don’t mind manual focus & manual aperture ring) the Laowa 10mm f/2.8 Zero-D FF is a compelling, creatively liberating lens that rewards thoughtful composition and careful technique.

I am quite happy with the photos from this lens. I gave 4.5 of 5 stars because of the manual focus and manual aperture ring. An autofocus version with 14-blades would be a 5 star – perhaps the 5-blade version already hits the mark, but I didn’t buy that version.


Check it out, here’s a link to it on Amazon. (Feature image courtesy of Amazon).

Enjoy Life and thanks for reading,

Jeff

Astro Photography: Meteor showers, Prepping To Shoot The Geminids: My First Meteor Shower! 432 432 Jeff G
Meteor thru dark sky

Astro Photography: Meteor showers, Prepping To Shoot The Geminids: My First Meteor Shower!

Lead Photo by Nick Iliasov on Unsplash, cropped version used.

Originally Published on Medium.com, 25-Nov-2025.

Edited for website posting. All images © Jeff Goetz.


Have you ever photographed a meteor shower!?

I haven’t yet (hence, the Unsplash cover photo), but I’m about to give it a try in December.

When I visited Big Bend National Park in April (reference my trip preparation article here), one of the workshops I attended was with National Parks at Night (NPAN), which was focused on using the PhotoPills app.

As part of the PhotoPills app, you can see when meteor showers are active and their location in the sky based on your location — that is totally cool!

As part of the workshop module on meteor showers, it was highlighted that the mid-December 2025 Geminids meteor shower would be one of the biggest (if not the biggest) meteor showers of the year. The ‘meteors per hour’ (met/h) forecast is off the charts compared to other meteor showers.

Note that there are meteor showers occurring regularly throughout the year. However, with intensities of 0.3 to 6.7 meteors per hour (met/h), or similar, they just don’t compare to the Geminids in December that will peak at ~150 met/h with a sustained period of 119 to 104 met/h over nearly 3 hours. Read that again, that’s an average of nearly 1.7 to 2+ meteors per minute if spread equally across the hour. And, we know where to look to see and photograph them — that is totally cool, did I mention that!?

Even before we left Big Bend, several workshop attendees agreed we would try to get together in December to use our newfound knowledge and photograph the meteor shower.

Our group of four has been reduced to two, but we are going, and the detailed planning has begun!


Using PhotoPills: Where To Find The Geminids

Screenshot from PhotoPills (iPad version). Image by Author.

Notes:

  1. The iPad app is much easier to use than the phone app when planning a shoot. The larger screen provides a cleaner interface to see the data.
  2. I’m referring in this article to some key PhotoPills features and data. I’m not providing detailed PhotoPills instructions or steps. Please use the references at the end of the article if you want to know more.

Picking a meteor shower

On the bottom left, you can see the different meteor showers and their intensities. The Geminids are our target for this trip. Look at that meteor per hour meter bar (the blue lines) — it’s maxed out! Here’s a zoomed view:

Image by Author. Screen clip from PhotoPills iPad app.

Based on the meteor shower data above, select a day and your location to shoot. You can see by the top left screen grab that I chose mid-December and the Chiricahua National Monument. My photo buddy lives in Arizona, not far from there, so it’s a great reason to visit a friend and explore some dark skies!

Image by Author. Screen clip from PhotoPills iPad app.

Peak Meteors Per Hour

Press enter or click to view image in full size

Image by Author. Screen clip from PhotoPills iPad app.

Plans are made, and we are meeting up for 3–4 days for some night photography, meteor shower shots, and talking shop about photography and life. Our meteor shower shoot will be Saturday, 13-DEC night and into the morning of 14-Dec. You can see above that the intensity is quite high throughout this period.

The Challenges

We were all excited — ‘Ah, great! We’ll meet in Arizona to capture one of the biggest meteor showers this year. Awesome, see you there!’ — but there are two challenges.

Challenge #1 — Azimuth, Elevation (Altitude) & Foreground

Press enter or click to view image in full size

Image from Wikipedia. https://en.wikipedia.org/wiki/Azimuth

Using PhotoPills, I adjusted the timeline to create a table and determine the Geminids’ location and intensity over the peak night.

Note: PhotoPills uses ‘Elevation’ in place of ‘Altitude’ shown in the Wikipedia graphic above.

Here’s what I found:

Table data taken from PhotoPills. Image by Author.

Do you see the challenge?

With Earth’s movement and the Geminids’ movement, the meteor shower placement in the sky moves from East to West throughout the night. It’s on a trajectory that puts it going directly overhead from East (azimuth of 77–80 degrees) to West (azimuth towards 280 degrees). At its peak, it’s essentially directly overhead.


I know I’m being selfish by wanting to capture the peak meteor shower. But, look at the ‘low’ numbers of 37–90 met/hr in the earlier dark hours. That’s still way higher than many meteor showers throughout the year. That’s my backup plan (that we will shoot first). It may be the primary plan if we get too tired through the night!


With night photography, you typically want and need some form of foreground to anchor your photo. The foreground helps pull the viewer’s eyes through the scene and up to the sky. With the peak nearly directly overhead, that makes it difficult to have any foreground.

To find some interesting foreground options, I used Google Maps and the street view feature. Surprisingly, Google has actually mapped some of the trails so you can see the views. We identified some potential foregrounds, such as the one below. Press enter or click to view image in full size

Screenshot from Google Maps, street view. Chiricahua National Monument.

A daytime reconnaissance trip with PhotoPills handy will definitely be needed to confirm our locations before we go out in the dark.

You would typically get your camera set up before blue hour so you can get some foreground photos to blend with your night photos. With the meteor shower moving through the night, that’s a challenge with one camera.


My Proposed Solution: Two Cameras

I think I’m going to bring two cameras and tripods, so I can have each set up prior to blue hour to get foreground shots in the East and West, and leave them set.

Set-up #1

My East-facing camera (Nikon Z8) will use a 10mm ultrawide angle lens, I intend to rent or buy, so I can get as much foreground and directly overhead views as possible.

With the 10mm field of view (circa 121.76 degrees in portrait mode — PhotoPills tells you these values, by the way!), I will determine when on-site if I’m getting enough of the peak meteor shower with the foreground, or if I need to rotate the camera nearly vertical after a certain time to just capture the peak meteor shower rate with an open sky and no foreground.

Set-up #2

My West-facing camera (astro-modified Nikon D800) will use my 14–24mm wide-angle lens (at 14mm with a 104.1 degree field of view) with some limited foreground. It will remain in place without movement after I get it set up. In post-processing, I will adjust my white balance and other settings to account for the additional light the D800 will get since it’s astro-modified — or I’ll consider renting another Z8 to avoid having to mess with those additional steps — to be determined.

Challenge #2 — Weather

Well, with all the planning and details outlined above, the other big challenge is the one I can’t do anything about — the weather.

Here’s hoping the weather will be clear and dry skies those nights. Fingers crossed.

Looking at historical data for this area in mid-December, history favors us having clearer skies.

We’ve done the planning. Wish us luck!


Regardless of the weather and photos we capture, I’m looking forward to getting out of the city and into some dark skies with photo friends — it is a form of therapy for me being out in nature like that.


How about you? Will you be out to catch the Geminids in December? Have any tips for me? I’d love any and all guidance to hopefully get some great results! Let me know in the comments below.

Enjoy Life and Thanks for Reading,

-Jeff


References:

The National Parks at Night (NPAN) guys are a fantastic resource. I have participated in their workshops, conferences (in-person and online), and one-on-one guidance sessions.

Here are the references I’m using, along with PhotoPills and Google Maps, as part of my prep for my meteor shower trip. I’d rather give full credit to the folks who prepared this concise, excellent information, rather than summarize and have someone assume I created it. Check out these three-part blog posts and consider buying the eBook listed in the links below. (Note: These are not affiliate links.)

Part 1:Using PhotoPills to Scout Meteor Showers

Part 2: How to Photograph a Meteor Shower

Part 3: How to Process a Meteor Shower Radiant

eBook: Meteor Shower Guide


Copyright © 2025 Jeff Goetz. All Rights Reserved.

Originally Published on Medium in the Full Frame publication. To read more of my writing on medium, click here.

×

Custom Request

Note: I will respond as soon as possible with quotation or questions for your review and acceptance. Once the custom scope is confirmed, I will send you final details and instructions for payment processing prior to order production.